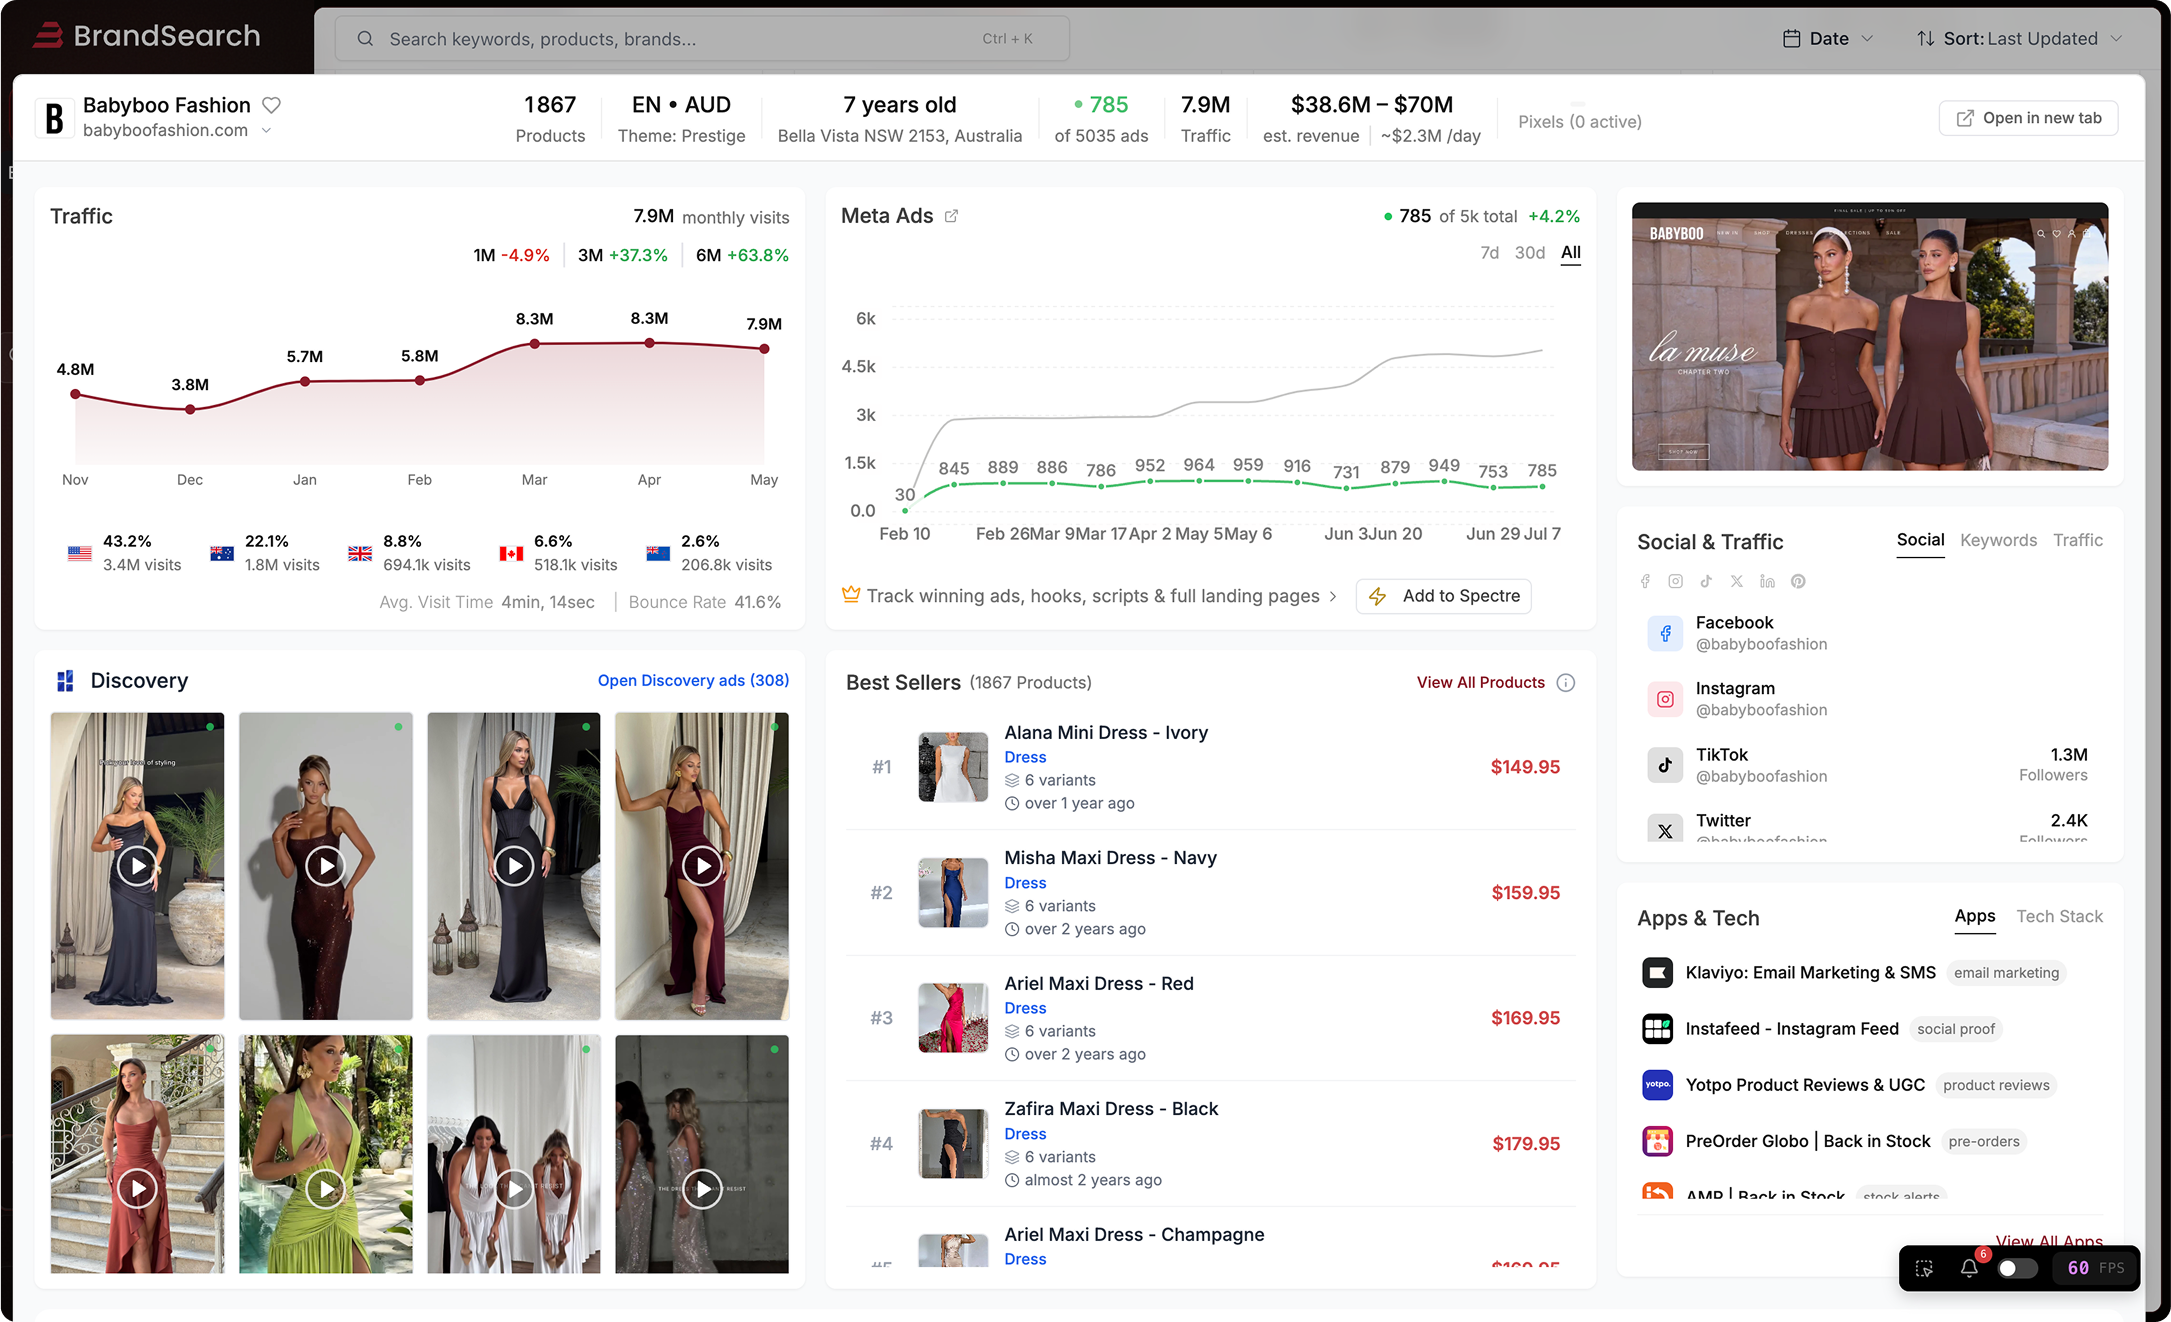
Loading brand data...
Experience Heyhae's gel nail strips: No LED needed, sunlight-cured in 5 minutes! Explore vibrant designs for every occasion. Our cruelty-free, durable collection offers salon-quality at home. Dive into the simplicity and beauty of Heyhae, where stunning nails are just sunlight away.
Monthly traffic, revenue estimates and visitor behavior — based on public data.
Heyhae (4db315.myshopify.com) is a United States-based online store specializing in /Beauty & Fitness/Face & Body Care/Skin & Nail Care. The store is generating approximately $302K in monthly revenue, attracting 46K monthly visitors, with a catalog of 60 products. This brand ranks as a growing store with steady visitor engagement in its category. Their technology stack includes Attentive: SMS + MMS Marketing, Awin ‑ Affiliate Marketing, and AMP | Back in Stock for enhanced store functionality. The majority (100%) of their traffic originates from United States.
Get precise traffic data
Exact visitor counts, traffic sources, geographic breakdowns & profit margins.
Top 6 products from this store. 60 total in catalog.

These lovely popsicle colors delicately marbled with softly sparkling glitter create an energetic combination reminiscent of a playful sunset drive. What's in it: 28 strips, 1 Prep pad, 1 Nail file, & 1 Wooden stick. No LED required How To Apply Step 1: Prep Your Nails Begin with clean, dry nails and push back your cuticles. Lightly buff your nails to create a smooth surface if needed. Then, use the included prep pad to eliminate any oils or residue. Step 2: Choose Your Size Select the gel nail strip that best fits each nail. If in doubt, choose the smaller size to avoid overlapping onto the skin or cuticles. Step 3: Apply the Strips Peel off the backing and carefully place the gel strip on the nail, starting from the cuticle line. Smooth it out towards the tip and press down firmly to ensure it was properly applied. *Tip to stretch nail strips: Use your palm to warm them up. Once the strips are warmed, they can be easily pulled for the perfect fit on your nails. Attach the nail strip along one side of the nail, and then stretch it to fit the other side of the nail. If you pull the nail strip with both hands, the adhesive may weaken, or the gel nail may stretch excessively, ruining the design. Step 4: Trim and File Use cuticle scissors or nail clippers to trim excess gel strips. Step 5: Cure The strips cure instantly under the light, but for optimal results and longevity, expose them to sunlight for 5-10 minutes. Once cured, shape the nail strip to your desired shape with a nail file. *Tip: File downwards to achieve the perfect shape. Step 6: Store Store unused strips in the pouch to protect them from sunlight. How To Remove Step 1: Peel Off Apply a few drops of “Got To Go Remover” on the cuticle line strip and let it soak in to help lift it. Then, using the provided wooden stick, gently peel the gel strip off from the edge towards the center of the nail. Step 2: Clean & Nourish Your Nails Wash your hands and hydrate your nails with cuticle oil or a nourishing nail cream.

Rich and inviting brown mocha syrup color that invites the thought of a comforting coffee run. How To Apply Step 1: Prep Your Nails Begin with clean, dry nails and push back your cuticles. Lightly buff your nails to create a smooth surface if needed. Then, use the included prep pad to eliminate any oils or residue. Step 2: Choose Your Size Select the gel nail strip that best fits each nail. If in doubt, choose the smaller size to avoid overlapping onto the skin or cuticles. Step 3: Apply the Strips Peel off the backing and carefully place the gel strip on the nail, starting from the cuticle line. Smooth it out towards the tip and press down firmly to ensure it was properly applied. *Tip to stretch nail strips: Use your palm to warm them up. Once the strips are warmed, they can be easily pulled for the perfect fit on your nails. Attach the nail strip along one side of the nail, and then stretch it to fit the other side of the nail. If you pull the nail strip with both hands, the adhesive may weaken, or the gel nail may stretch excessively, ruining the design. Step 4: Trim and File Use cuticle scissors or nail clippers to trim excess gel strips. Step 5: Cure The strips cure instantly under the light, but for optimal results and longevity, expose them to sunlight for 5-10 minutes. Once cured, shape the nail strip to your desired shape with a nail file. *Tip: File downwards to achieve the perfect shape. Step 6: Store Store unused strips in the pouch to protect them from sunlight. How To Remove Step 1: Peel Off Apply a few drops of “Got To Go Remover” on the cuticle line strip and let it soak in to help lift it. Then, using the provided wooden stick, gently peel the gel strip off from the edge towards the center of the nail. Step 2: Clean & Nourish Your Nails Wash your hands and hydrate your nails with cuticle oil or a nourishing nail cream. What's in it: 28 strips, 1 Prep pad, 1 Nail file, & 1 Wooden stick. No LED required

Sorry, Coffee Girls—Matcha Girl in the House! The refreshing vibes of matcha with this chic design that strikes the perfect balance between matcha and sage green hues. It captures the essence of a matcha lover’s style, offering a subtle yet invigorating touch that’s both sophisticated and playful. Perfect for those who want to keep things light, breezy, and utterly charming. How To Apply Step 1: Prep Your Nails Begin with clean, dry nails and push back your cuticles. Lightly buff your nails to create a smooth surface if needed. Then, use the included prep pad to eliminate any oils or residue. Step 2: Choose Your Size Select the gel nail strip that best fits each nail. If in doubt, choose the smaller size to avoid overlapping onto the skin or cuticles. Step 3: Apply the Strips Peel off the backing and carefully place the gel strip on the nail, starting from the cuticle line. Smooth it out towards the tip and press down firmly to ensure it was properly applied. *Tip to stretch nail strips: Use your palm to warm them up. Once the strips are warmed, they can be easily pulled for the perfect fit on your nails. Attach the nail strip along one side of the nail, and then stretch it to fit the other side of the nail. If you pull the nail strip with both hands, the adhesive may weaken, or the gel nail may stretch excessively, ruining the design. Step 4: Trim and File Use cuticle scissors or nail clippers to trim excess gel strips. Step 5: Cure The strips cure instantly under the light, but for optimal results and longevity, expose them to sunlight for 5-10 minutes. Once cured, shape the nail strip to your desired shape with a nail file. *Tip: File downwards to achieve the perfect shape. Step 6: Store Store unused strips in the pouch to protect them from sunlight. How To Remove Step 1: Peel Off Apply a few drops of “Got To Go Remover” on the cuticle line strip and let it soak in to help lift it. Then, using the provided wooden stick, gently peel the gel strip off from the edge towards the center of the nail. Step 2: Clean & Nourish Your Nails Wash your hands and hydrate your nails with cuticle oil or a nourishing nail cream. What's in it: 28 strips, 1 Prep pad, 1 Nail file, & 1 Wooden stick. No LED required

The perfect romantic white seamlessly transitioning to a chic nude gradient embodying the epitome of elegance. How To Apply Step 1: Prep Your Nails Begin with clean, dry nails and push back your cuticles. Lightly buff your nails to create a smooth surface if needed. Then, use the included prep pad to eliminate any oils or residue. Step 2: Choose Your Size Select the gel nail strip that best fits each nail. If in doubt, choose the smaller size to avoid overlapping onto the skin or cuticles. Step 3: Apply the Strips Peel off the backing and carefully place the gel strip on the nail, starting from the cuticle line. Smooth it out towards the tip and press down firmly to ensure it was properly applied. *Tip to stretch nail strips: Use your palm to warm them up. Once the strips are warmed, they can be easily pulled for the perfect fit on your nails. Attach the nail strip along one side of the nail, and then stretch it to fit the other side of the nail. If you pull the nail strip with both hands, the adhesive may weaken, or the gel nail may stretch excessively, ruining the design. Step 4: Trim and File Use cuticle scissors or nail clippers to trim excess gel strips. Step 5: Cure The strips cure instantly under the light, but for optimal results and longevity, expose them to sunlight for 5-10 minutes. Once cured, shape the nail strip to your desired shape with a nail file. *Tip: File downwards to achieve the perfect shape. Step 6: Store Store unused strips in the pouch to protect them from sunlight. How To Remove Step 1: Peel Off Apply a few drops of “Got To Go Remover” on the cuticle line strip and let it soak in to help lift it. Then, using the provided wooden stick, gently peel the gel strip off from the edge towards the center of the nail. Step 2: Clean & Nourish Your Nails Wash your hands and hydrate your nails with cuticle oil or a nourishing nail cream. What's in it: 28 strips, 1 Prep pad, 1 Nail file, & 1 Wooden stick. No LED required

Inspired by desert sunsets and festival lights, this hypnotic blend of soft gradients and bold hues brings Coachella glam straight to your nails. A set made for the wild and free. 60% semi-cured gel nail stickers that are solar gel nails, curing effortlessly in sunlight without the need for an LED lamp. How To Apply Step 1: Prep Your Nails Begin with clean, dry nails and push back your cuticles. Lightly buff your nails to create a smooth surface if needed. Then, use the included prep pad to eliminate any oils or residue. Step 2: Choose Your Size Select the semi cured gel nail strips that best fit each nail. If in doubt, choose the smaller size to avoid overlapping onto the skin or cuticles. Step 3: Apply the Strips Peel off the backing and carefully place the gel nail strips on the nail, starting from the cuticle line. Smooth it out towards the tip and press down firmly to ensure it was properly applied. *Tip to stretch nail strips: Use your palm to warm them up. Once the strips are warmed, they can be easily pulled for the perfect fit on your nails. Attach the nail strip along one side of the nail, and then stretch it to fit the other side of the nail. If you pull the nail strip with both hands, the adhesive may weaken, or the gel nail may stretch excessively, ruining the design. Step 4: Trim and File Use cuticle scissors or nail clippers to trim excess gel strips. Step 5: Cure The strips cure instantly under the light, but for optimal results and longevity, expose them to sunlight for 5-10 minutes. Once cured, shape the nail strip to your desired shape with a nail file. *Tip: File downwards to achieve the perfect shape. Step 6: Store Store unused strips in the pouch to protect them from sunlight. How To Remove Step 1: Peel Off Apply a few drops of “Got To Go Remover” on the cuticle line strip and let it soak in to help lift it. Then, using the provided wooden stick, gently peel the gel strip off from the edge towards the center of the nail. Step 2: Clean & Nourish Your Nails Wash your hands and hydrate your nails with cuticle oil or a nourishing nail cream. What's in it: 28 strips, 1 Prep pad, 1 Nail file, & 1 Wooden stick. No LED required

A clear, dried rose hue that beautifully harmonizes with any skin tone. The unique watercolor texture offers a fresh and distinct appearance every time you look at your nails, ensuring that your style remains dynamic and ever-evolving. How To Apply Step 1: Prep Your Nails Begin with clean, dry nails and push back your cuticles. Lightly buff your nails to create a smooth surface if needed. Then, use the included prep pad to eliminate any oils or residue. Step 2: Choose Your Size Select the gel nail strip that best fits each nail. If in doubt, choose the smaller size to avoid overlapping onto the skin or cuticles. Step 3: Apply the Strips Peel off the backing and carefully place the gel strip on the nail, starting from the cuticle line. Smooth it out towards the tip and press down firmly to ensure it was properly applied. *Tip to stretch nail strips: Use your palm to warm them up. Once the strips are warmed, they can be easily pulled for the perfect fit on your nails. Attach the nail strip along one side of the nail, and then stretch it to fit the other side of the nail. If you pull the nail strip with both hands, the adhesive may weaken, or the gel nail may stretch excessively, ruining the design. Step 4: Trim and File Use cuticle scissors or nail clippers to trim excess gel strips. Step 5: Cure The strips cure instantly under the light, but for optimal results and longevity, expose them to sunlight for 5-10 minutes. Once cured, shape the nail strip to your desired shape with a nail file. *Tip: File downwards to achieve the perfect shape. Step 6: Store Store unused strips in the pouch to protect them from sunlight. How To Remove Step 1: Peel Off Apply a few drops of “Got To Go Remover” on the cuticle line strip and let it soak in to help lift it. Then, using the provided wooden stick, gently peel the gel strip off from the edge towards the center of the nail. Step 2: Clean & Nourish Your Nails Wash your hands and hydrate your nails with cuticle oil or a nourishing nail cream. What's in it: 28 strips, 1 Prep pad, 1 Nail file, & 1 Wooden stick. No LED required
54 more products
Revenue per product, sales velocity & trending status
Organic vs paid traffic, top SEO keywords and geographic audience distribution.
Last 12 months
5 ad creatives running on Meta platforms. Analyze messaging, targeting strategy, and creative angles.

Gel nails… without the lamp? Yes, really. ☀️ Heyhae’s real gel nail strips cure with natural sunlight, giving you a salon-quality manicure without the salon visit. No appointments. No drying time. No LED lamp. Just peel, press, and let the sun lock in that glossy gel finish. ✔ Lasts up to 2 weeks ✔ Easy to apply in minutes ✔ Perfect for switching styles anytime 🎁 First order? Buy One Get One FREE 🚚 Free U.S. shipping on $25+

Sun-cured gel nails that promise zero dry time and a flawless finish. Keep the glam, not the wait! ⏱️✨ Now available at Target

Easy, durable nails at home with our 100% gel nail strips that cure under the sun ☀️ Just peel, press & glow. 🏆 Loved by Allure, InStyle, & BuzzFeed 🎁 First order? Buy One, Get One Free! 🚚 Free U.S. shipping on $25+ #affordablebeauty #diy #manicure #nailinspo

Easy, durable nails at home with our 100% gel nail strips that cure under the sun ☀️ Just peel, press & glow. 🏆 Loved by Allure & Glamour 🎁 First order? Buy One, Get One Free! 🚚 Free U.S. shipping on $25+ #affordablebeauty #diy #manicure #nailinspo

From on to off, it’s all easy ✨ Heyhae’s 100% gel strips apply in seconds and lift off cleanly with our Got to Go Remover — no mess, no damage, no salon. 🏆 Loved by Allure, InStyle & BuzzFeed 🎁 First order? Buy One, Get One Free! 🚚 Free U.S. shipping on $25+
44 more ad creatives
Ad spend, audience targeting & creative performance
Complete breakdown of Shopify apps, marketing tools, analytics platforms, and conversion optimization technologies powering this e-commerce store's operations.
Showing 5 technologies • 3 more available

Security, reliability and speed everywhere, powered by an intelligent global network.

Arrive gives you accurate and timely updates on everything you order, across all online retailers.

Make contactless, secure purchases in stores, in apps, and on the web.
Showing 5 applications • 3 more available
Grow faster and more efficiently with email, sms, reviews and more. Powered by your customer data.
Submits Product Feed for Google Shopping, Microsoft, Facebook & Pinterest. Manages PMAX Campaigns.
Drive Revenue with Back in Stock Notifications to Avoid Lost Sales from Sold Out Products
Triple Whale brings the metrics & attribution that matter most into one easy-to-use dashboard.
Get winning data you can't find anywhere else, save 95% of your time, and replace $1500+/m in tools. The platform built to make you rich fast for sure.
"The ability to see exactly what creatives are scaling for our competitors is a cheat code. We've improved our hit rate on new ad launches by over 300%."


Showing 6 of 6 similar stores with overlapping products, audience, and strategies.


See all competitors, ad creatives, and marketing strategies for Heyhae.
Start free


Everything you need to know about heyhae.co
According to BrandSearch data, heyhae.co's product catalog includes 60 items. Analyze their winning products, trending items, pricing strategies, product descriptions, and top sellers. See which products drive the most revenue and learn from their product selection strategy to find your own winning products for dropshipping or private label.
According to BrandSearch analytics, heyhae.co receives approximately 46,274 monthly visitors. BrandSearch provides detailed traffic analytics including organic vs paid traffic sources, geographic distribution, bounce rates, session duration, and estimated monthly revenue ranges. Use these performance metrics to benchmark your own Shopify store and set realistic growth targets.
Yes! BrandSearch's ad intelligence reveals heyhae.co's complete Meta advertising strategy including 43 active Facebook ads, Instagram ads, and ad creatives. Analyze their ad copy, visual hooks, call-to-actions, targeting strategies, and promotional offers. Study their winning ad creatives to inspire your own Facebook and Instagram advertising campaigns and improve your ROAS (Return on Ad Spend).
BrandSearch's technology detection identifies heyhae.co's complete tech stack including all Shopify apps, theme, payment processors, email marketing tools, analytics platforms, and conversion optimization apps. See which apps they use for reviews, upsells, abandoned cart recovery, SEO, and social proof. Copy their winning tech stack to build a high-converting Shopify store without trial and error.
BrandSearch provides full competitive intelligence on heyhae.co: traffic sources (organic SEO, paid ads, social media, email), top SEO keywords driving traffic, geographic markets, customer demographics, advertising spend estimates, and growth trends. Identify gaps in their product range, find underserved niches, analyze their pricing strategy, and discover opportunities to differentiate your brand. Perfect for competitive analysis and market research.
BrandSearch helps you identify heyhae.co's business model by analyzing their product catalog, supplier patterns, shipping locations, pricing margins, and product uniqueness. See if they're running a dropshipping operation, selling private label products, or manufacturing their own goods. Based in United States, Learn from their product sourcing and fulfillment strategies to optimize your own e-commerce operations.


See every product, winning ad, traffic source and revenue signal behind Heyhae — in seconds.
Explore other stores similar to Heyhae